
Install and setup wireguard vpn client


Introduction
We already learned about how to self host wireguard vpn on server. But didn't learned about setup the client. If you still not self-hosted wireguard vpn server. You can follow this guide to self host one.
You will going to learn following things in this blog:-
- Install & Setup Wireguard client in GNU/Linux.
- Install & Setup Wireguard client in Windows.
- Install & Setup Wireguard client in MacOS (Don't have a Macbook 😀 so just download the client and setup the way I explained windows).
Let's start
Install & Setup Wireguard client in GNU/Linux
Let's start with
sudo apt updateThis takes care of all the pending updates which are needed to be done.
sudo apt install wireguardThe above ⬆️ line tells apt package manager to search for the package name wireguard and install it into your system.
sudo nano /etc/wireguard/wg0.confYou tell your machine to create a file named wg0.conf in the /etc/wireguard folder. You can use any text editor like - nano, vi, micro, etc.
Paste your configuration file similar to this
[Interface]
PrivateKey = XXXXXXXXXXXXXXXXXXXXXX
Address = 192.xx.xx.x/xx,fdxx:xx:xx::x/xx
DNS = 1.1.1.1,1.0.0.1

[Peer]
PublicKey = XXXXXXXXXXXXXXXXXXXXXXXXXXXXXXXXX
PresharedKey = XXXXXXXXXXXXXXXXXXXXXXXXXXXXXXXXXXXX
Endpoint = xxx.xx.xx.xx:xxxx
AllowedIPs = xxxxxxxx
If using Nano editor
Press CTRL + O Enter key
Press CTRL + X Enter key
For Vim
Press ESC key
Type :wq and Entery key
Then just type
sudo wg-quick up wg0This line check for the configuaration you just added into wg0.conf file and will start a server for you.
But I expect it to throw an error for you. And it will be going to do as I expected.
So move to the next step
sudo apt install resolvconfThis line will save you through the error and will start your wireguard client properly.
Now the final step
sudo systemctl enable wg-quick@wg0This line says to your systemd to enable wireguard service during startup.
Now you can chill and enjoy your wireguard vpn.

Install & Setup Wireguard client on Windows
Just click on this link to download wireguard client
https://download.wireguard.com/windows-client/wireguard-installer.exe
Install it into your pc.
Save your peer configuration with any file name which ends with .conf like wg0.conf. Paste your configuration and save it.
Now after opening wireguard client you will see interface similar to this
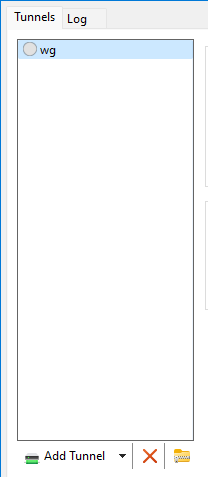
click on add tunnel and choose your file you just created.
Then just click on activate. Now enjoy and chill.
Install & Setup Wireguard client in MacOS
Not tried yet in MacOS but you can try follow same steps as did in windows.

Click on this link to download client for mac.
We just completed the blog hopefully you enjoyed reading it. If you face any issues just let me know in comment section.