How to Encrypt a USB Drive With VeraCrypt (And What Most Guides Get Wrong)
Most encryption tools try hard to feel friendly. VeraCrypt does the opposite. It looks dated, asks you to slow down, and offers no safety net if you make a mistake. Yet in 2025, VeraCrypt is still what people reach for when they actually need a USB drive locked down for real. This isn’t a tutorial full of checklists, it’s a plain explanation of how VeraCrypt works in practice, why its rough edges are intentional, and what you should understand before trusting it with your data.
You can watch a tailored tutorial for the same -
How to add password to your device
If you’re tired of "corporate" encryption tools that feel like black boxes, VeraCrypt is probably exactly what you’re looking for. It’s not flashy, it doesn’t have a "Pro" subscription, and the UI hasn’t changed much in a decade. But when it comes to actually locking down data so that nobody, not even a forensic la,b can get in, this is the industry standard.
Here is a practical look at how to actually use it in 2025 and why it’s worth the 15-minute learning curve.
What exactly is VeraCrypt doing?
Think of VeraCrypt as a digital safe that lives inside a regular file.
You create a file (let’s call it vault.hc), and to your computer, it just looks like a random, corrupted file. But when you "mount" it through VeraCrypt and enter your password, it appears as a new drive letter (like Z:) on your system. You drag your files in, "dismount" it, and that Z: drive vanishes. Everything inside is now encrypted and invisible.
1. The "Encrypted USB" Use Case
This is probably the most common way to use it. If you carry a USB stick with scans of your ID, tax returns, or private keys, a standard password-protected thumb drive is easily bypassed.
- How it helps: You can encrypt the entire USB stick. When you plug it in, Windows will ask, "Do you want to format this drive?" (Because it can't read the encrypted data). You hit Cancel, open VeraCrypt, and mount the drive. If you lose that USB at an airport, your data is 100% safe.
2. Adding a Layer to Cloud Storage (Dropbox/Google Drive)
Cloud providers encrypt your data on their servers, but they hold the keys. If their security is breached or they’re subpoenaed, your data is exposed.
- How it helps: Create a 5GB VeraCrypt container file inside your local Dropbox folder. Put your sensitive docs in that container. Now, you are encrypting the data before it ever touches the cloud. Dropbox just sees a single large file changing; they have no idea what’s inside.
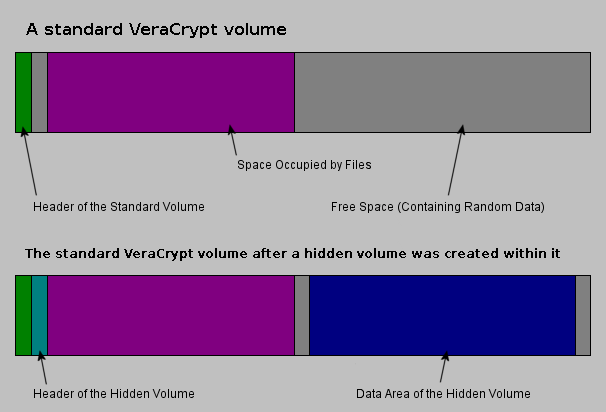
3. The "Hidden Volume" (The Real Magic)
This is VeraCrypt’s most famous feature. It allows you to create a "Hidden Volume" inside your "Outer Volume."
- The Scenario: Someone forces you to give up your password.
- The Solution: You give them the password to the Outer Volume, which contains some "decoy" sensitive files (like old bank statements). But your truly private data is in the Hidden Volume, which has its own password.
- Why it works: Because the free space in a VeraCrypt volume is filled with random data, it is mathematically impossible for an attacker to prove that a second, hidden volume even exists.
How to Set Up Your First Vault (Without Breaking Anything)
Setting up VeraCrypt isn't hard, but it’s "fussy." If you rush through the menus, you’ll end up with a setup that’s either too slow to use or not as secure as it could be. Here is the 10-minute workflow I use.
Phase 1: The Installation
First, grab the latest version from veracrypt (As of 2025, we’re on v1.26.x).
- Pro Tip: During installation, it’ll ask if you want "Install" or "Extract." Choose Install unless you specifically need a portable version on a USB stick. The installed version includes the driver needed for better performance and system-level features.
Phase 2: Creating the Container
Open the app and hit Create Volume. You’ll see three choices. For 95% of users, you want the first one: "Create an encrypted file container." This keeps your OS and other files safe while giving you a "digital safe" for the sensitive stuff.
- Select Location: Click "Select File." Name it something boring like
system_logs.datorbackground_image.hc. It doesn’t need a specific extension, and hiding it in plain sight is never a bad idea. - Encryption Options: Just stick with AES and SHA-512 (or the newer BLAKE2s if you want to be cutting-edge). AES is hardware-accelerated on almost every modern CPU, so it won’t lag your machine.
- Volume Size: Think about what you’re storing. If it’s just keys and docs, 500MB is plenty. If it’s a whole project’s worth of code and assets, go for 10GB+. Note: You can't resize this easily later, so give yourself some breathing room.
- The Password: Use a long passphrase. Not a "password," a sentence. If you use a password under 20 characters, VeraCrypt will literally nag you about it. Listen to the nag.
Phase 3: The "Magic" Moment (Formatting)
This is where people get confused. You’ll see a window with a bunch of random numbers changing and a progress bar at the bottom.
- The Mouse Wiggle: You need to move your mouse randomly inside that window. This isn't a gimmick; it’s harvesting "entropy" from your physical movements to create a truly random encryption key. Do it until the bar turns green.
- Filesystem: Choose exFAT. It’s the most "modern" choice and ensures that if you ever need to open this vault on a Mac or a Linux machine, it’ll actually work.
How to Actually Use It Day-to-Day
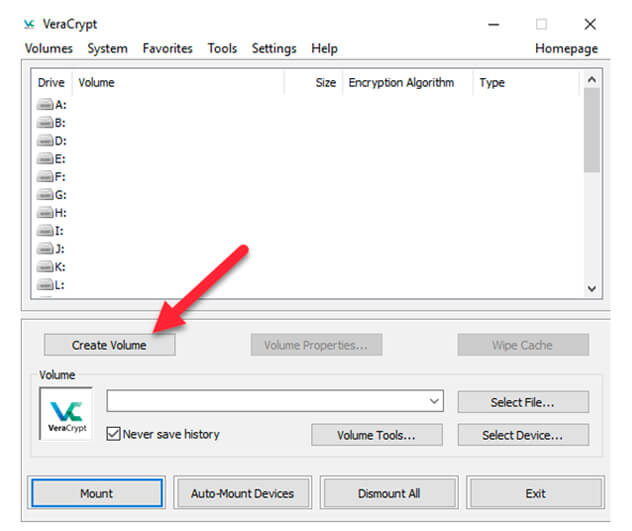
Once the wizard is done, you’ll notice... nothing happened. No new drive appeared. That’s because you have to Mount it.
- In the main VeraCrypt window, pick a random drive letter (like
M:orX:). - Click Select File and find that
system_logs.datyou created. - Click Mount and type your password (Fig 1).
- Important: When you’re done, go back to VeraCrypt and hit Dismount. If you don't dismount, your data is sitting there unencrypted and "open" to anyone who walks up to your computer. (Fig 2)
Boom.
Now, when you open "This PC" or Finder, there’s a new "Local Disk" there. Use it like a normal folder.
The "Oh Crap" Checklist
Before you close the app, do these two things:
- Backup the Header: Go to
Volume Tools > Backup Volume Header. If the first few bits of your file get corrupted, you lose everything. This tiny backup file is your only insurance policy. - Check the "Auto-Dismount": In Settings, I always set mine to "Auto-dismount when the screen saver starts" or "when the user logs off." It’s a lifesaver for the one time you forget to lock your laptop at a coffee shop.
A Warning for New Users
VeraCrypt is "Zero Knowledge" software. If you lose your password or your Volume Header gets corrupted, there is no "Forgot Password" link. Your data is gone forever.
Pro-Tip: Once you create a volume, go to Volume Tools > Backup Volume Header. Save that tiny backup file on a separate drive. If your container file ever gets slightly corrupted, that header backup is the only thing that will save your data.
Why use this over BitLocker?
Open source matters. VeraCrypt’s code is public. If there was a backdoor for a government agency, the security community would have found it by now. BitLocker is great for convenience, but VeraCrypt is for people who want to own their own locks and keys.